~ 8 min read
Building a Link Curation API with Platformatic
I run a monthly newsletter of articles and code I’ve found interesting. Be sure to check it out if you haven’t already. The main tool I’ve used was revue, later ghost and both are powered by links I favourite either on twitter or github. This process isn’t flawless, but with the recent announcements of twitter shutting down literally everything good they’ve ever made, I’m keen to find a better solution. So when Platformatic invited me to check out their platform, I decided it would be a great opportunity to create my own link curation API. Here I’ll walk you though the process of how you can do this too.
First, to kick off everything Platformatic has a really helpful installer that will walk you through setting things up.
npm create platformatic@latestI’m going to create a Platformatic DB application and accept most of the defaults - but I”m not going to apply migrations yet and ask it to create a github workflow so I can later deploy to the platformatic cloud:
- Which kind of project do you want to create?  => DB
- Where would you like to create your project?  => curator
- Do you want to create default migrations?     => yes
- Do you want to create a plugin?               => yes
- Do you want to use TypeScript?                => no
- Do you want to to run npm install?            => yes (this can take a while)
- Do you want to apply the migrations?          => no
- Do you want to generate types?                => yes
- Do you want to create the GitHub action to deploy this application to Platformatic Cloud? => yes
Once this is all done, you’ll see a whole new project has been scaffolded complete with README and .env files.
Creating the API
I need to modify the default migration to represent my data. In the /migrations directory I edited the 001.do.sql file to create a table for link attributes.
CREATE TABLE links (
  id INTEGER PRIMARY KEY,
  link VARCHAR(1024) NOT NULL,
  title VARCHAR(255) NOT NULL,
  created_at DATETIME DEFAULT CURRENT_TIMESTAMP
);
Similarly, the reverse migration 001.undo.sql also needs to be updated like so:
DROP TABLE links;To create the db apply the first migration by calling:
npx platformatic db migrations applyIt’s also possible to have this run automatically when your server starts if you’d like. I’m going to leave that for now.
NB: If you ever need to reverse a migration you can do so with:
platformatic db migrations apply -r You’ll see that our database file db.sqlite has been created for us. We can then go ahead and start our server with:
npm run startYou should be able to open the url shown in your terminal and see a helpful “Welcome to Platformatic DB” message. What’s even more impressive is that we have a full API using our model we can play with already. All without writing any backend code!
If you look at http://localhost:3042/documentation, you should also see a full set of swagger docs ready for you to explore and try it out.
Lets go ahead and test our new API by adding a link:
curl -X POST -H "Content-Type: application/json" -d "{ \"title\": \"Microsoft announces new Bing and Edge browser powered by upgraded ChatGPT AI\", \"link\": \"https://www.theverge.com/2023/2/7/23587454/microsoft-bing-edge-chatgpt-ai\" }" http://localhost:3042/linksYou should get something like the following as a response:
{"id":1,"link":"https://www.theverge.com/2023/2/7/23587454/microsoft-bing-edge-chatgpt-ai","title":"Microsoft announces new Bing and Edge browser powered by upgraded ChatGPT AI", "createdAt":"1675860230686"}You can find all links that have been saved by making a GET request:
curl http://localhost:3042/linksAdding Migrations
It also would be good to organise each link I save with a number of tags. To do so I need to add another migration. Lets add a 002.do.sql file to our migrations directory to make these changes. Since this is a many to many relationship this is going to include two tables, one for the tags and another for the tags each link has.
CREATE TABLE tags (
  id INTEGER PRIMARY KEY,
  name VARCHAR(255) NOT NULL UNIQUE
);

CREATE TABLE link_tags (
  tag_id INTEGER NOT NULL,
  link_id INTEGER NOT NULL,
  CONSTRAINT fk_tag_id FOREIGN KEY (tag_id)  REFERENCES tags(id),
  CONSTRAINT fk_link_id FOREIGN KEY (link_id)  REFERENCES links(id),
  PRIMARY KEY (tag_id, link_id)
);
Again we also add corresponding reverse migration as 002.undo.sql.
DROP TABLE tags;
DROP TABLE link_tags;
Then to apply the new migration we call apply again:
npx platformatic db migrations applyIf we visit our documentation again, we can see that we now have REST urls for our new tags and link tags model. Lets add a tag for the link I just saved:
curl -X POST -H "Content-Type: application/json" -d "{ \"name\": \"ai\" }" http://localhost:3042/tags
...
{"id":1,"name":"ai"}
curl -X POST -H "Content-Type: application/json" -d "{ \"linkId\": 1, \"tagId\": 1 }" http://localhost:3042/linkTags
...
{"id":1, "linkId":1, "tagId": 1}Querying with GraphQL
Platformatic has also given us a full graphql API, which you’ll find an interface for at http://127.0.0.1:3042/graphiql.
So if I wanted to pull back the links having a particular tag, I could use a query like so:
query{
  linkTags (where: {tagId: {eq: 1}}) {
    link {
      title,
      link
    }
  }
}
We can see I’m going to want to lookup the ids of tags prior to saving them, so a useful query would give me every tag in a list of arguments. Let’s try a query for that:
query {
  tags (where: {name: {in: ["ai", "microsoft"]}}){
    id,
    name
  }
}
Extending the REST API
I want to extend our current API with some custom behaviour. Within this route, I’d like to save the link, along with it’s tags and create appropriate relationships for them. Fortunately, Platformatic makes adding custom behaviour like this easy for us.
Within plugin.js, lets define a route /save-with-tags that will lookup tags we already have saved and create any new ones in a single request:
module.exports = async(app, opts) => {
    app.post('/save-with-tags', async(req, reply) => {
      const { tags, url, title } = req.body
      const res = await app.platformatic.entities.tag.find({
        where: {
          name: {
            in: tags
          }
        }
      });

      if (res) {
        return res
      }
      return null
    })
};
This uses the entity API to find all the tags we’ve already saved in the database when they are supplied as part of a POST request. I want to create new tags as well, so let’s update the route to add them before we return:
      ...
      const existing = res.map(value => {return value.name});
      const toAdd = tags.filter(value=>!existing.includes(value));
      let finalTags = res;

      if (toAdd.length > 0) {
        const inserted = await app.platformatic.entities.tag.insert({
            fields: ["id"],
            inputs: toAdd.map(value=> {return {name: value}})
        });
        finalTags = finalTags.concat(inserted);
      }
      ...
Now all tags have been added, I want to create the link itself. Lets again use the entity API for this:
      ...
      const savedLink = await app.platformatic.entities.link.save({
        input: {
            title: title,
            link: url,
        }
      });
      ...
Finally, I can create all the link tag relationships for every one of the tags. I’ll update the return with the link we created:
      await app.platformatic.entities.linkTag.insert({
        inputs: finalTags.map(value => {
            return {tagId: value.id, linkId: savedLink.id}
        })
      });

      if (savedLink) {
        return savedLink
      }
      return null
Creating a Bookmarklet
It’s going to be a pain for me manually submitting URL’s of interest over an API every time I want to save a webpage. Lets create a bookmarklet to do it instead. A bookmarklet is basically some javascript that runs as if it were a bookmark in a browser.
In our case this will just POST to my extended API and show the title when it responds. If you’re following along, the bookmarklet itself will need all the space and newlines removed when saved. Tags are delimited by commas.
javascript: (async () => {
  const tags = prompt('tags').split(",").map(name => name.toLowerCase().trim());
  const rawResponse = await fetch('http://localhost:3042/save-with-tags', {
    method: 'POST',
    headers: {
      'Accept': 'application/json',
      'Content-Type': 'application/json'
    },
    body: JSON.stringify({title: document.title, url: document.URL, tags: tags})
  });
  const content = await rawResponse.json();

  alert("Saved '" + content.title + "'");
})();
This requires disabling CORS (Cross Origin Resource Sharing) on our local server, which prevents unauthorised requests from a browser with a different origin. This is a bad idea for production (you should instead build a full frontend application) but fine for my little prototype here. To do that set the “origin” value of cors in platformatic.db.json to * (wildcard).
  "server": {
      ...
    "cors": {
      "origin": "*"
    },
  }
Deploying to Platformatic Cloud
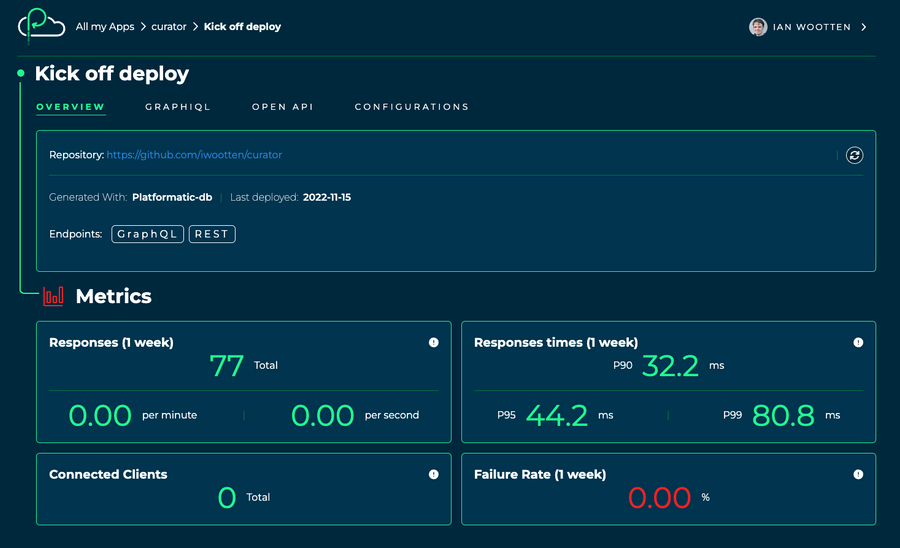
Earlier during setup we created the github workflow we needed to deploy to the platformatic.cloud which you can sign up to for free. If you head to github and create a repo, you can then initialise it with what you have created already and push it to a branch on github.
Follow the official docs for setting things up. Once that’s done, when you open pull requests for your repo on github the changes will be instantly deployed on a subdomain of platformatic.cloud. You’ll also be presented with a useful dashboard for tracking things like the response time and requests for your app.
Conclusion
Platformatic is a really interesting approach to putting together an API for your application. I love that I can get a full API without writing a lot of the necessary cookie cutter code that isn’t specific to a use case. It’s very quick to add just the code I need and it’s going to be very simple to build upon should I ever want to take this further and build this into a full application. Right now, you even get a continuous integration environment configured out of the box.
All the code I’ve shown here for the API is available in this repo on github, so check it out if you’re interested.