~ 6 min read
Automatic Static Site Creation with Astro, Supabase and Netlify
This week, I revealed mixes.it - a very simple site I’ve created for indexing DJ mixes scraped from the web. I wanted a no-frills site that I could get Spotify playlists of DJ’s I like to see what new music they were playing and that I didn’t have to spend much time supporting.
I used Astro and Supabase to create the site itself and the whole thing is currently built using Netlify. The nice thing about this is that the sites creation is completely automated once my scraping workflow has collected new data to my database and triggered a build hook on Netlify.
Working with Astro
Astro is a new framework to help you ship less JavaScript in your static sites. It’s designed so you can use your own framework of choice - be it React, Vue, something else or even HTML and CSS (!). It also has some other nice features such as automatic sitemap generation.
I could have looked at other frameworks like 11ty (which is probably the sensible route given the amount of other devs using it), but I fancied playing with something new and shiny.
Astro is really simple to work with, using a page and component syntax very similar to JSX. It works very much like a static site generator, like Hugo or Jekyll. Creating a page within the pages directory maps directly to the final builds location, so pages/index.astro goes to your index page.
My whole mixes.it site consists of just 3 components and two pages. Here’s the code behind my pages/index.astro page.
---
// Component Imports
import Mixes from '../components/Mixes';
import Nav from '../components/Nav';
import Header from '../components/Header';

const title = 'mixes.it - The Best DJ Mix Playlists from around the web';
---
<html lang="en">
<Header title={title} />
<body>
    <div class="container">
        <main>
            <Nav />
            <Mixes />
        </main>
    </div>
</body>
</html>
You can see each of the components here, which are all fairly self explanatory. The mixes component breaks down to the code you see below, where you can see I’m pulling my data from Supabase using its REST API and using a map on the results to generate a table of mixes. I found working with a fetch call much simpler than interpreting the Supabase clients return errors and this way we don’t have any additional dependencies to install over Astro itself.
---
const response = await fetch(`${__SNOWPACK_ENV__.SNOWPACK_PUBLIC_SUPABASE_URL}/rest/v1/mixes?select=*&order=first_broadcast.desc`, {headers: {
  'apikey': __SNOWPACK_ENV__.SNOWPACK_PUBLIC_SUPABASE_KEY
}});
const mixes = await response.json();
---
<table class="table table-striped table-hover">
  <thead>
    <tr>
      <th scope="col">Title</th>
      <th scope="col">Artist</th>
      <th scope="col">Broadcast</th>
      <th scope="col">Spotify Playlist</th>
    </tr>
  </thead>
  <tbody>
    {mixes
        .filter(x => x.spotify_playlist)
        .map((mix) => (
            <tr>
            <td><a href={`./mix/${mix.id}`}>{mix.title}</a></td>
            <td>{mix.artist}</td>
            <td>{mix.first_broadcast}</td>
            <td><a href={mix.spotify_playlist}>[Spotify]</a></td>
            </tr>
        ))
    }
</tbody>
</table>
The part of this that took me the longest was actually finding a way of getting environment variables to propagate from the .env file I had created to my views. Snowpack, on which Astro is based can have this feature enabled when @snowpack/plugin-dotenv is installed. However, it will only read environment vars when they are prefixed with “SNOWPACK_PUBLIC_”, in order to ensure you understand they will be exposed in the application at build time. As I don’t actually use the variables within the content of my HTML, this isn’t a worry as the JS is removed.
Dynamic Routes
As well as the main index page, I wanted individual pages for each of the mixes found. This is achievable using [bracket] notation where a file at pages/mix/[mid].astro would be responsible for returning mix/1 mix/2 etc.
Within this page, it’s necessary to define a getStaticPaths function for returning all the individual id’s and page content that would need to be known at build time. Here’s how that individual page looks in my app.
---
import Header from '../../components/Header';
import Nav from '../../components/Nav';

export async function getStaticPaths() {
    const response = await fetch(`${__SNOWPACK_ENV__.SNOWPACK_PUBLIC_SUPABASE_URL}/rest/v1/mixes?select=*,mixes_tracks(artistname,trackname,label)`, {headers: {
        'apikey': __SNOWPACK_ENV__.SNOWPACK_PUBLIC_SUPABASE_KEY
    }});
    const mixes = await response.json();

    return mixes.map((mix) => {
        return {
            params: { mid: mix.id.toString() },
            props: { mix }
        };
    });
}

const {mid} = Astro.request.params;
const {mix} = Astro.props;
const title = `${mix.title} - ${mix.artist}: mixes.it`
---
<html lang="en">
<Header title={title} />
<body>
    <div class="container">
    <Nav />

<h1>{mix.title} - {mix.artist}</h1>
<p>{mix.first_broadcast}</p>
<p><a href={mix.url}>{mix.url}</a></p>
<a class="btn btn-success" href={mix.spotify_playlist}>Spotify Playlist</a>
<table class="table table-striped table-hover">
  <thead>
    <tr>
      <th scope="col">#</th>
      <th scope="col">Track</th>
      <th scope="col">Artist</th>
      <th scope="col">Label</th>
    </tr>
  </thead>
  <tbody>
{mix.mixes_tracks.map((track, index) => (
  <tr>
    <td>{index + 1}</td>
    <td>{track.trackname}</td>
    <td>{track.artistname}</td>
    <td>{track.label}</td>
  </tr>
))}
  </tbody>
</table>
</div>
</body>
</html>
The getStaticPaths function could in fact just return a list of mix ids, however we want to display the mix data returned within the page so it needs us to map the array so we can pass the full mix object as a prop and access it within the page.
Building with Netlify
Building the final site is a simple npm run build, so can be executed on any continuous integration platform you choose. I’ve opted for netlify as it’s free for publishing sites for my purposes and has the simplest amount of configuration I need to setup.
Exposing my project as a github repo complete with a netlify.toml file means that its incredibly simple to get my site visible on the web.
[build]
command = "npm run build"
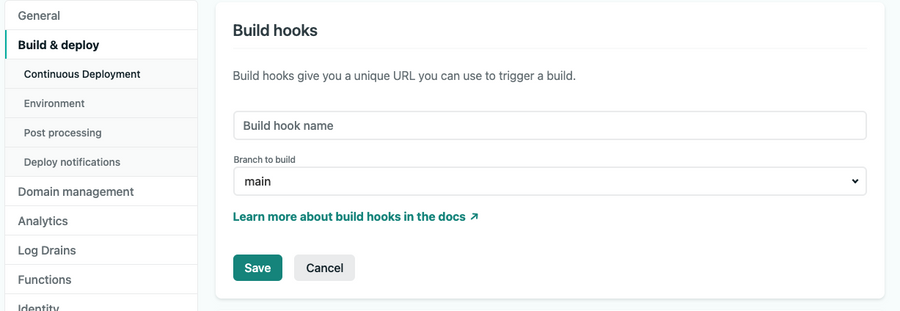
publish = "dist"I also added a Netlify build hook, so that I could trigger builds from my scraping workflow. Netlify makes this easy, allowing you to select the relevant branch from a project and request a hook URL. Once created, you can make a POST request to that hook and trigger a build.
All that remains is configuring your custom domain to point to netlify correctly, which you can find details of within “Domain management” in Netlify.
Conclusion
This was a quick an dirty example with Astro, but I feel one that really shows the power of these tools together. I like that I can pick and choose sources to push back to Supabase and kick off builds asynchronously when updates have been made from scraping data. I’m planning on adding a number of other sources over time.
It’s mostly completely hands off, except for if I’d like to make changes (which lets face it I most likely will). With netlify in hand, these changes are immediately published when pushed back to my github repo.
In a future article, I will detail how you can scrape data to Supabase in the way I’m doing here to something structured (like a playlist) for use at a later date.