~ 7 min read
Setting Up a New M1 Mac for Development
I recently updated my 2012 Mac Mini with a 2021 M1 Mac Mini and decided to document the first time setup process. You can also check out a youtube video I’ve made on setting it up. What follows is all the steps in written form as a handy reference for you to copy and paste from - or future me. Surprisingly, the installation process was fairly simple now there are versions of software written for Apples new architecture. There’s a number of different things I cover so use these links to jump to the parts you’re most interested in:
- Natural Scroll
- Dock Settings
- Displaying your home folder in Finder
- Dividing Up Your Screen
- Applications
- xcode-tools
- Homebrew
- Oh My Zsh
- SSH Key
- GPG Key
- Docker
- Python
- Poetry
- Node
Mac OS Preferences
There’s a number of things I dislike that are switched on by default in Mac OS. These are all personal and meant to streamline my work as a developer. Pick and choose your own preferences.
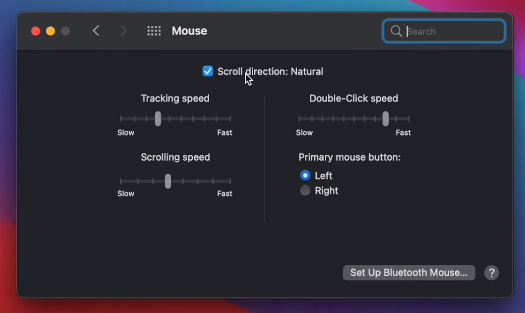
Natural Scroll
Why Apple felt inverting the mouse was necessary for their devices, I’ll never really understand and is just confusing when switching between Apple and PC as I’m regularly doing. This is the first thing I always disable.
To disable it, go to: “System preferences > Mouse > Scroll Direction: Natural” and uncheck the box.
Dock Settings
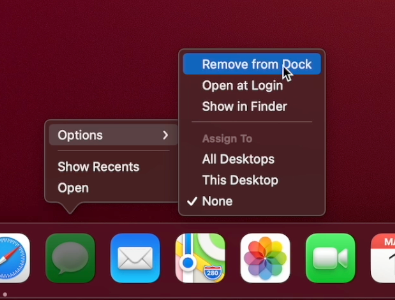
I find the dock really busy and distracting with all the default applications that are lined along it. I don’t have a need for most of them and so remove them straight away. You always have the option of adding them back there and everything is able to be found through spotlight.
You can remove each one by right clicking the icon and selecting: “Options > Remove from Dock”
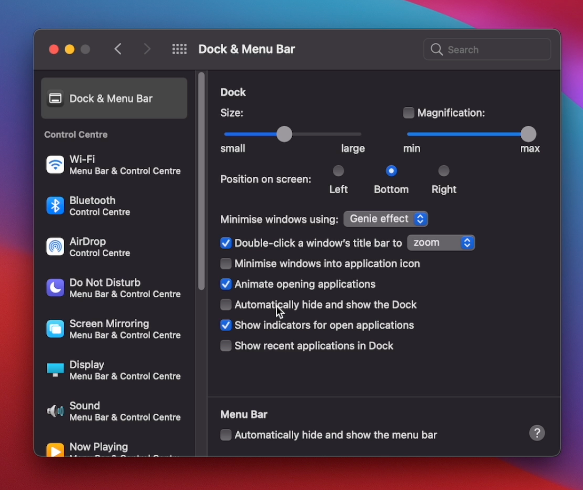
The recent icons also take a chunk of space, they can be removed by: “System Preferences > Dock & Menu Bar” and unchecking “Show recent applications in Dock”
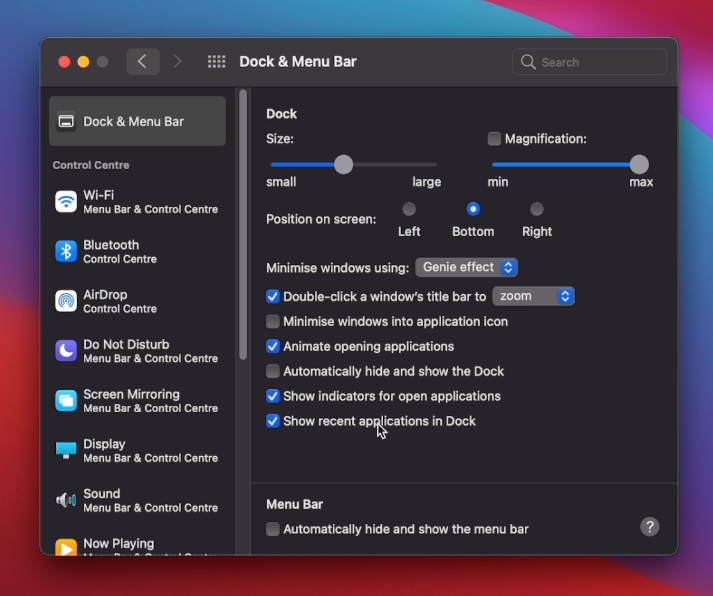
I like to see the full desktop whilst I’m working, so I also enable “Automatically hide and show the Dock”.
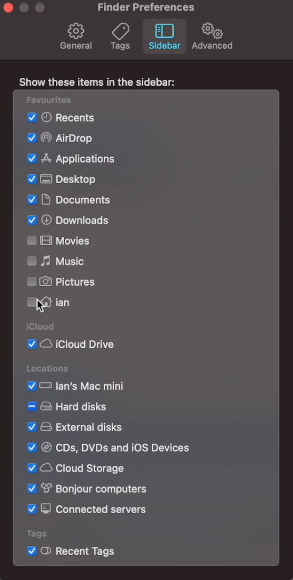
Displaying your home folder in Finder
I like being able to navigate to my home folder as quickly as possible. Unfortunately finder doesn’t display it by default, but it’s available as a favourite if you open finders preferences from the menu bar and select it. I like dragging it to the top of my finder favourites once it is showing.
Dividing Up Your Screen
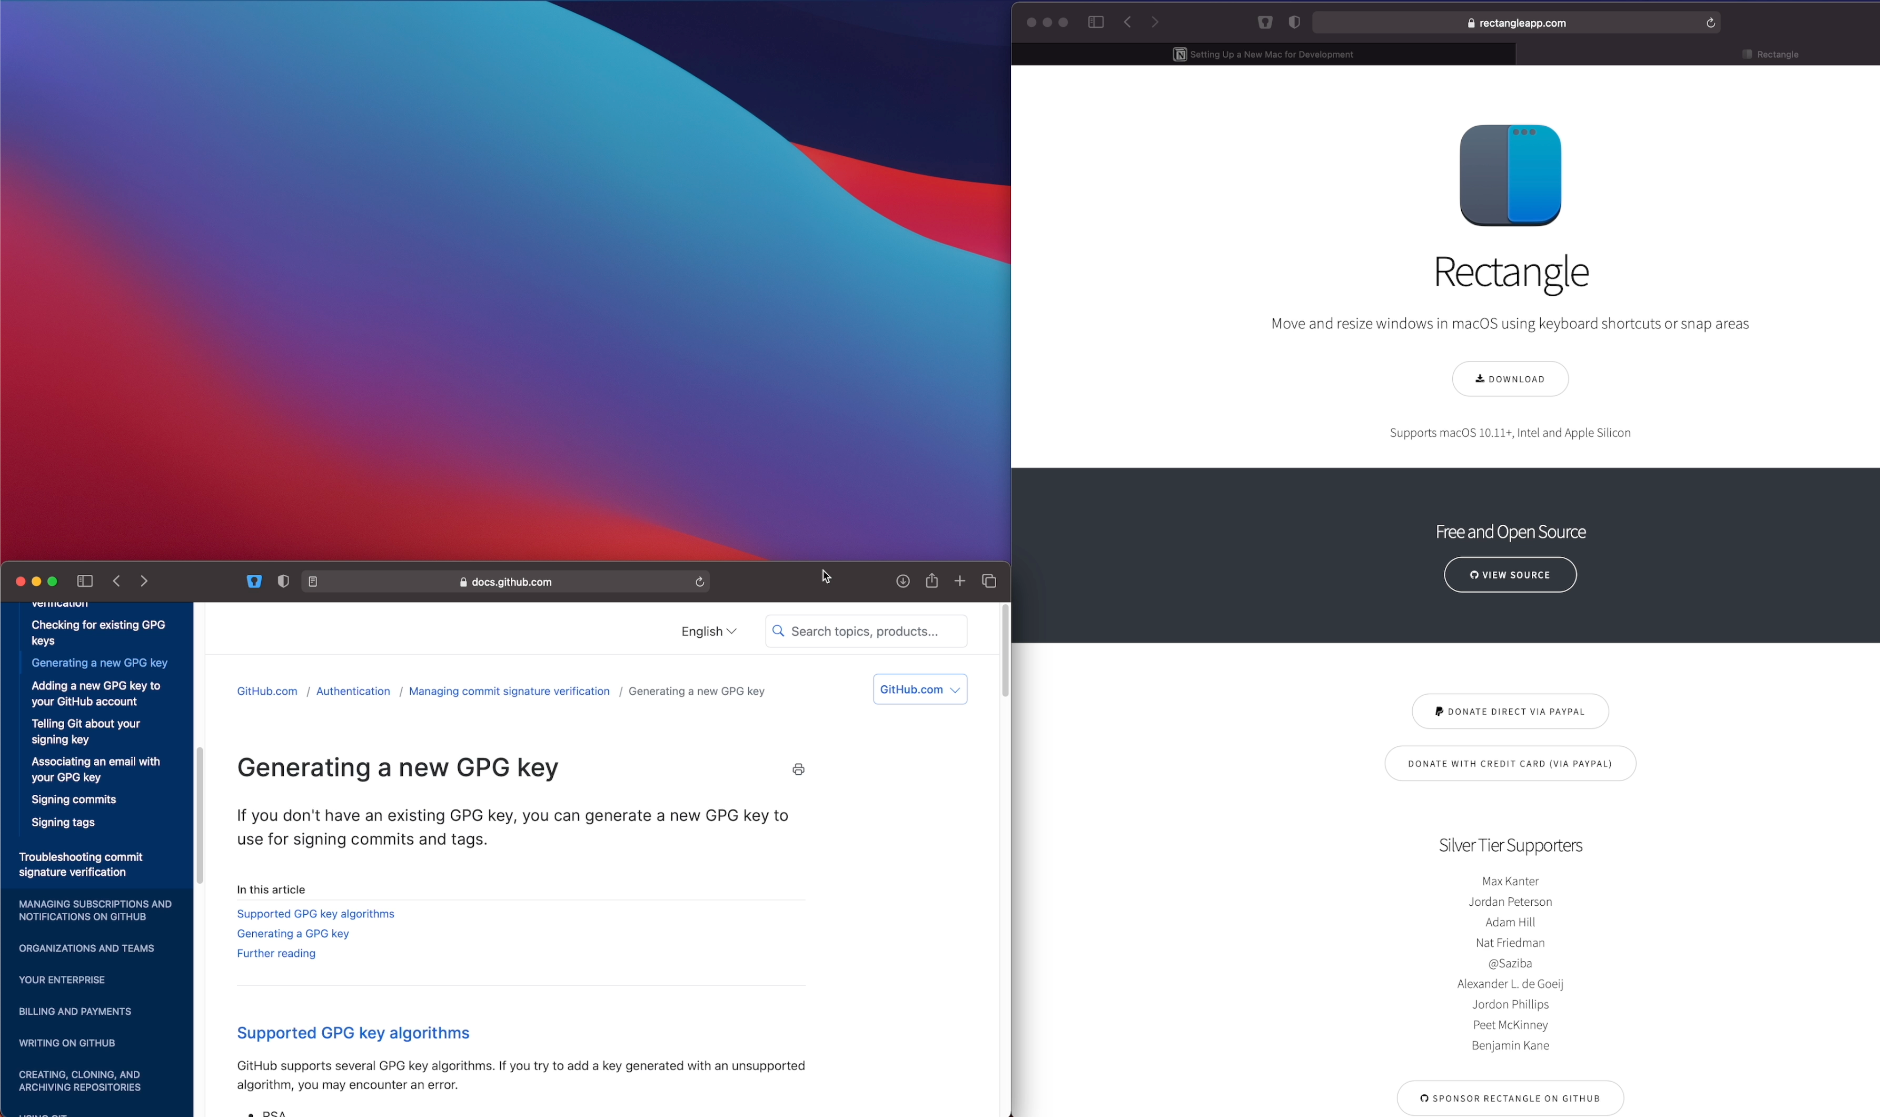
I’m returning to MacOS from Ubuntu and I’ve become pretty accustomed to being able to snap windows to either side of the screen, a feature that doesn’t exist by default in Big Sur.
Rectangle is a nice free solution available to resolve this, which allows you divide up your screen into columns and rows using a collection of key combos/mouse gestures.
Dock Applications
I like to have certain apps I use more regularly always on hand in the dock. These currently all have M1 versions available, which are linked below. When they’re open you can right-click “Options > Keep in Dock”

For each of these you’ll need to select “Apple Silicon” to get the build appropriate for your M1 Mac.
Terminal Applications Installation
We now move into the install for tools I’m going to be frequently using within terminal.
Installing xcode-tools:
By default only Python 2.7.16 is installed which has been deprecated for the whole of 2020. We need to install Xcode Tools for the majority of steps that follow. In my video I execute “python3” which is a stub which requires the xcode-tools and installs it.
xcode-select --installHomebrew
Homebrew is the de facto package manager favoured by devs for installing software on MacOS. It can be installed with the following command.
/bin/bash -c "$(curl -fsSL [https://raw.githubusercontent.com/Homebrew/install/HEAD/install.sh](https://raw.githubusercontent.com/Homebrew/install/HEAD/install.sh))"Homebrew will end with a command you’ll need to copy to execute to make brew available whilst working in terminal. It looks something like the following - with {username} set to your own username:
echo 'eval $(/opt/homebrew/bin/brew shellenv)' >> /Users/{username}/.zprofile
eval $(/opt/homebrew/bin/brew shellenv)
Following this your should now have brew available and ready to use within terminal.
Oh My Zsh
Oh my zsh installs a number of fancy themes for terminal and shortcuts for tools like git. It allows you to see branches when in git directories with status indicated by the cursor colour which is really useful and saves a lot of repeated commands.
It can be installed with:
sh -c "$(curl -fsSL https://raw.githubusercontent.com/ohmyzsh/ohmyzsh/master/tools/install.sh)"SSH Key
Setting up ssh keys gives us the ability to authenticate with source control services like github. Github has good documentation on generating them, which I followed during the tutorial. To generate the keys and add them to the ssh agent run (replacing {your_email} with your own email address):
ssh-keygen -t ed25519 -C "{your_email}"
eval "$(ssh-agent -s)"
You now need to create a ssh config:
touch ~/.ssh/config
nano ~/.ssh/config
Paste in the following to load the key:
Host *
  AddKeysToAgent yes
  UseKeychain yes
  IdentityFile ~/.ssh/id_ed25519
To add the key to the ssh-agent and add it to the keychain run:
ssh-add -K ~/.ssh/id_ed25519Copy the key you’ve created with the command below and visit github.com/settings and add to your github SSH keys.
pbcopy < ~/.ssh/id_rsa.pubGPG Key
GPG allows us to sign commits locally so that github is able to display that they came from a verified source. Again, the best source of information on creating these is githubs docs.
brew install gpggpg --full-generate-keyThe only default I change throughout the key generation is that of the bitsize, which I set to 4096, as advised by githubs docs.
You then need to copy the key id you’ve generated by listing it and copying the part that falls after ’/’ on the “sec” line.
gpg --list-secret-keys --keyid-format LONG
/Users/ian/.gnupg/pubring.gpg
------------------------------------
sec   rsa4096/3AA5C34371567BD2 2021-03-01 [SC]
uid              [ultimate] Ian Wootten <hi@niftydigits.com>
ssb   rsa4096/42B317FD4BA89E7A 2021-03-01 [E]
The key id in this example is 3AA5C34371567BD2.
gpg --armor --export 3AA5C34371567BD2
# Prints the GPG key ID, in ASCII armor format
This prints your key out, at which point you’ll want to copy and add it to github.com/settings.
We need to tell git which gpg key to use which is done with the following:
git config --global user.signingkey 3AA5C34371567BD2I always want to sign my commits, so I run the following to enable it for every local repo.
git config --global commit.gpgsign trueThe important step I miss in the video is that as well as adding to the bash profile, I need to source this in zprofile so gpg is available within zshell.
echo 'export GPG_TTY=$(tty)' >> ~/.profile
echo "source ~/.profile" >> .zprofile
Docker
I use docker for wrapping up most of my webapps when I need to ensure remote environments have the same state as my local one.
Docker has a M1 version available for installation complete with a nice red banner on the icon to show it’s only currently a preview. Docker threw a warning when running the test image, so only time will tell whether there are any issues with my existing containers.

Python
To install python, you should use pyenv, this will allow for multiple local versions of python which don’t interfere with one another. It’s available using homebrew
brew install pyenvLook for latest version install, and set as global
pyenv install 3.9.1pyenv global 3.9.1Poetry
As well as managing versions of python, you also will want to manage the python packages for each of your projects. For that we install Poetry, which can be done with the following command:
curl -sSL https://raw.githubusercontent.com/python-poetry/poetry/master/get-poetry.py | python -Node
To install node, similarly to Python - we use the node version manager (nvm) so we’re able to install multiple versions of it.
curl -o- https://raw.githubusercontent.com/nvm-sh/nvm/v0.37.2/install.sh | bashTo install the latest version use:
nvm install nodeI found that using the latest version of node in the above command (15.11.0) failed - but in the video I had success with 15.10.0 on the M1, so you might want to try installing that if you hit problems.
I like using yarn, so as a final point, go ahead and install that.
npm install --global yarnConclusion
If you followed the same steps as me, you should now have a full fledged Mac ready to get started coding with. I’m just getting started with the M1 so expect updates as to what does/doesn’t work as time goes on.