~ 7 min read
Creating Social Images with Puppeteer
In this post I’m going to show how to generate images for sharing content on social networks like twitter and facebook using Puppeteer. This could be for any content - a post on our blog or something more complex like a dynamic storefront. So long as we correctly include open graph meta tags within the markup appropriate for the sites in question, our nicely designed image will be included as part of the apps feeds, rather than a blank preview. In a future post I’ll show how we can take this design and use it as the basis of a template within a serverless function we can query via an API.
A lot of the details here have been simplified and adapted/updated from this OpenGraph tutorial on egghead.io from Chris Biscardi. My own preferences for this are to use Puppeteer over Playwright and I also found a couple of the Netlify steps were outdated so future posts will detail changes I made to get them to work.
Coming Up with a Design
I found the best way of getting started with social image generation is keeping things simple: A hard coded html/css page! This way, we get to mockup a design that works for us without any of the complexities of anything else in the mix. You’re going to be reusing the design a lot, so taking your time here to get something that looks good and you want to use to promote your posts in your feeds is important. You can even stick with this approach if your image needs aren’t all that complex. For my own particular use case this is great, as I can insert a unique image into each blog post which will be marked up with appropriate meta tags by my blogging app Hugo.
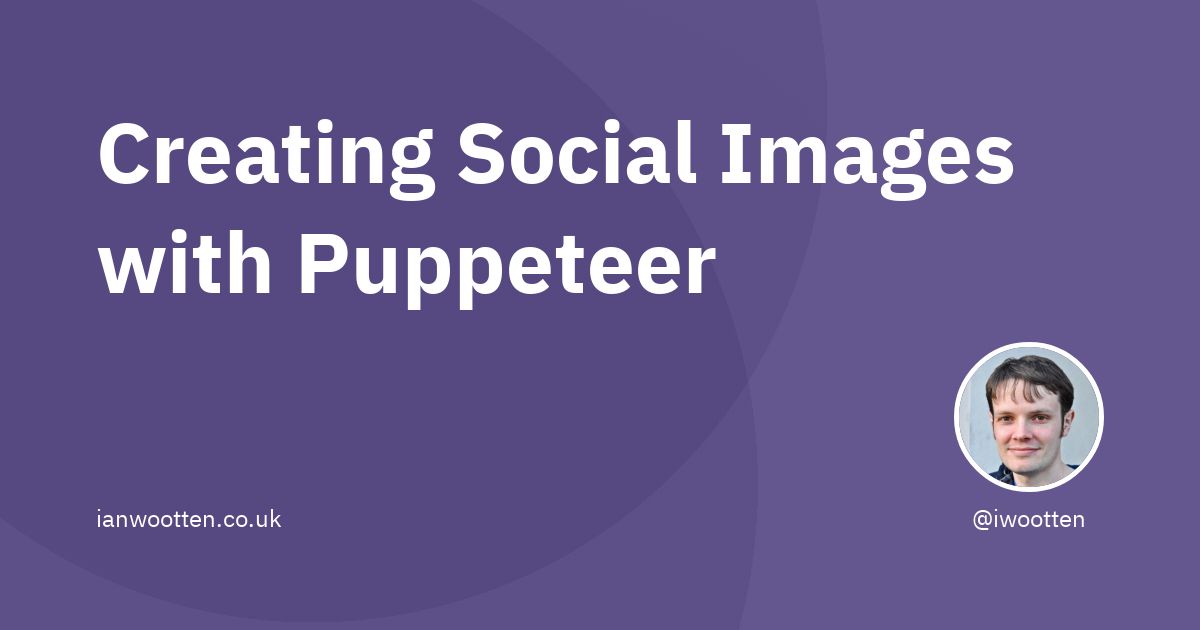
I’m using a simple flexbox layout, with font’s taken from Google fonts and a background gradient taken from gradient magic as the main theme for my design. This means it’s possible for me to easily switch out the background with another gradient if I want to use different styles. There’s a multitude of designs that will suit a variety of purposes, or you could use a simple image from unsplash for example. I’ve included all the source for this in my opengraph-puppeteer repo.
Getting a flexbox layout I was happy with took me a while. The beauty of this approach however is that we have all the features of CSS to our advantage, including all those fancy features such as flexbox, gradients and drop shadows.
My html page uses dimensions of 1200px x 630px set by a class. This allows me to easily switch to use different dimensions by applying other classes if I decide to generate images for different platforms. These dimensions are taken from this brilliant figma template by Ryan Warner, which allows us to see image previews across a multitude of different platforms to ensure consistent branding.
Capturing an Image
In order to capture this as an image, I use Puppeteer from Google locally. Puppeteer controls Chrome headlessly and allows me to do anything I might usually do within a browser. You can install it using yarn with:
yarn install puppeteerThe puppeteer script below mounts the webpage we’ve designed from a local file, renders it and takes a screenshot, using the outer container dimensions to capture the image position. Capturing the dimensions in this way means we only need change a class to create images of different sizes which is useful when creating images for different social networks.
const puppeteer = require('puppeteer')
const fs = require('fs');
const html = fs.readFileSync("./index.html", "utf-8");

(async () => {
	let browser = await puppeteer.launch({
		headless: true
	})
	let page = await browser.newPage()
		await page.setContent(html)
		const container = await page.evaluate(() => {
		const gradient = document.getElementById("container");
		const { x, y, width, height } = gradient.getBoundingClientRect();
		return { x, y, width, height };
	});
	await page.screenshot({ path: opengraph.jpg, clip: container })
	await browser.close()
})();
We can easily execute it by invoking it with node:
node image.jsWhen executed, our image is saved locally. Hopefully, this is what you see if you link or have seen a preview of this post on twitter. I reserve the right to update my branding as time goes on though :)
Adding Meta Tags for Sharing
Using Hugo, as I do within my own setup, getting appropriate meta tags is a case of correctly including a link to the local image within the markdown file. Other blogging tools such as Ghost will also allow you to upload an image to use for previews and insert the meta tags into the post’s html.
---
title: "Creating Social Images with Puppeteer"
date: 2021-02-16T10:07:59Z
draft: true
tags:
  - js
  - puppeteer
  - open graph
categories:
  - development
images:
  - "images/open-graph-images/open-graph-images-puppeteer.jpg"
---
If you’re writing your html by hand, you’ll need to embed the opengraph meta tags into the <head> of the page yourself. Twitter also has a number of meta tags of their own for cards. Each of the tags is pretty descriptive and you can see how they translate to a card preview once shared on twitter below.
<meta property="og:title" content="The Years I've Spent on Side Projects Have Not Been Wasted" />
<meta property="og:description" content="In my 18 years online, I’ve spent large chunks of time exploring ideas that never came into fruition. I’ve gone years building out software I’ve never made into saleable products for a multitude of reasons. The standard indie hacker journey would have you believe that this is time wasted, pointless where iterating quickly and shipping products that sell would get you to that magic monthly recurring revenue you so desperately desire." />
<meta property="og:type" content="article" />
<meta property="og:url" content="https://www.ianwootten.co.uk/2021/02/04/the-years-ive-spent-on-side-projects-have-not-been-wasted/" />
<meta property="og:image" content="https://www.ianwootten.co.uk/images/time-wasted-sideprojects/veri-ivanova-clock.jpg" />
<meta name="twitter:card" content="summary_large_image"/>
<meta name="twitter:image" content="https://www.ianwootten.co.uk/images/time-wasted-sideprojects/veri-ivanova-clock.jpg"/>
<meta name="twitter:title" content="The Years I've Spent on Side Projects Have Not Been Wasted"/>
<meta name="twitter:description" content="In my 18 years online, I’ve spent large chunks of time exploring ideas that never came into fruition. I’ve gone years building out software I’ve never made into saleable products for a multitude of reasons. The standard indie hacker journey would have you believe that this is time wasted, pointless where iterating quickly and shipping products that sell would get you to that magic monthly recurring revenue you so desperately desire."/>
Testing Meta Tags
Before posting to social media - it’s worth checking our post to confirm our social network of choice is going to render the image we’ve created as expected. I use twitters card validator to confirm things look as I want, but each social network provides their own tools for previewing OpenGraph tags (and name them something different):
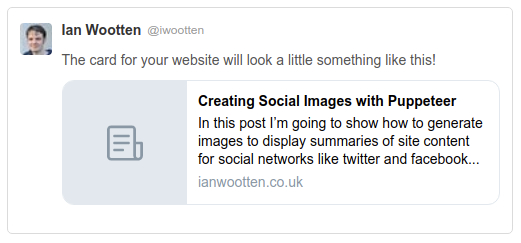
As an example - here’s how the post is rendered if the image meta tag is broken - which happened during the course of publishing this post, so it’s definitely worth checking!
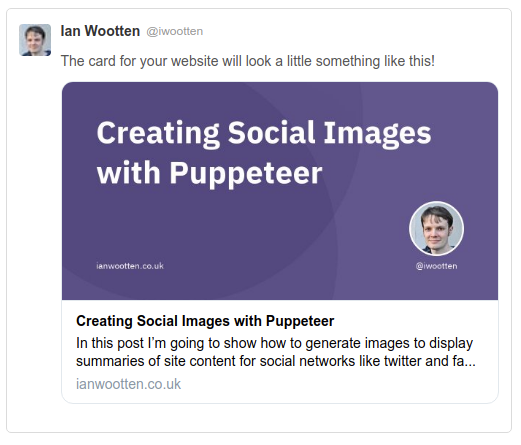
Here’s how the validator renders when the tags are correctly set:
Conclusion
I’ve demonstrated how you can generate consistent branding for your site, by using a puppeteer script locally. This will hopefully make me more efficient (and seem more professional) when it comes to writing interesting posts. In the future, I could further develop this idea to use serverless functions to wrap an api for around script which can be called from other services.